PROJECT: 3D Printed Curta Mechanical Calculator Type 1
Curta is such a beauty, I wanted to have one for a long time. After seeing a 3D printed Curta, I had a plan to make one as soon as I had an access to the 3D printer. Later I learned how much work that was involved in building one. Several hundred hours of high resolution prints as well as the difficulty of printing mechanical parts that can easily break or wear out depending on the filament types and the direction of the print. Also, the assembly requires incorporation of many hardware parts as well as modifying printed parts.
Well.. now that my Prusa Mini have arrived and some of the priority parts for the other projects have been completed, it is time to take on the Curta Type 1 project. I fully (or maybe not) understand the scale of this project, so I will be taking it slow and avoid getting frustrated. I plan to use the down time in between projects to build it slowly and to ensure it gets a full attention that it deserves. I must say I am very very excited as I will have a full access to the inner workings of a Curta Mechanical Calculator as well as a hands-on experience of building one.
There is a Curta Type 1 that have been getting updates from the original maker/designer which I am using. Once I get this project done, I may venture in to the Curta Type 2 (the designer have made it, but have not yet printed it as of June 2020, so mach debugging effort maybe needed). Also, it will be very cool, if I can design a Type 3 version incorporating modern engineering and perhaps make it a bit closer to the original size like 2:1 size. Here we go!
Curta Type 1 - I used the 5/12/2020 updated version
Curta Type II
Thingivers Curta Group
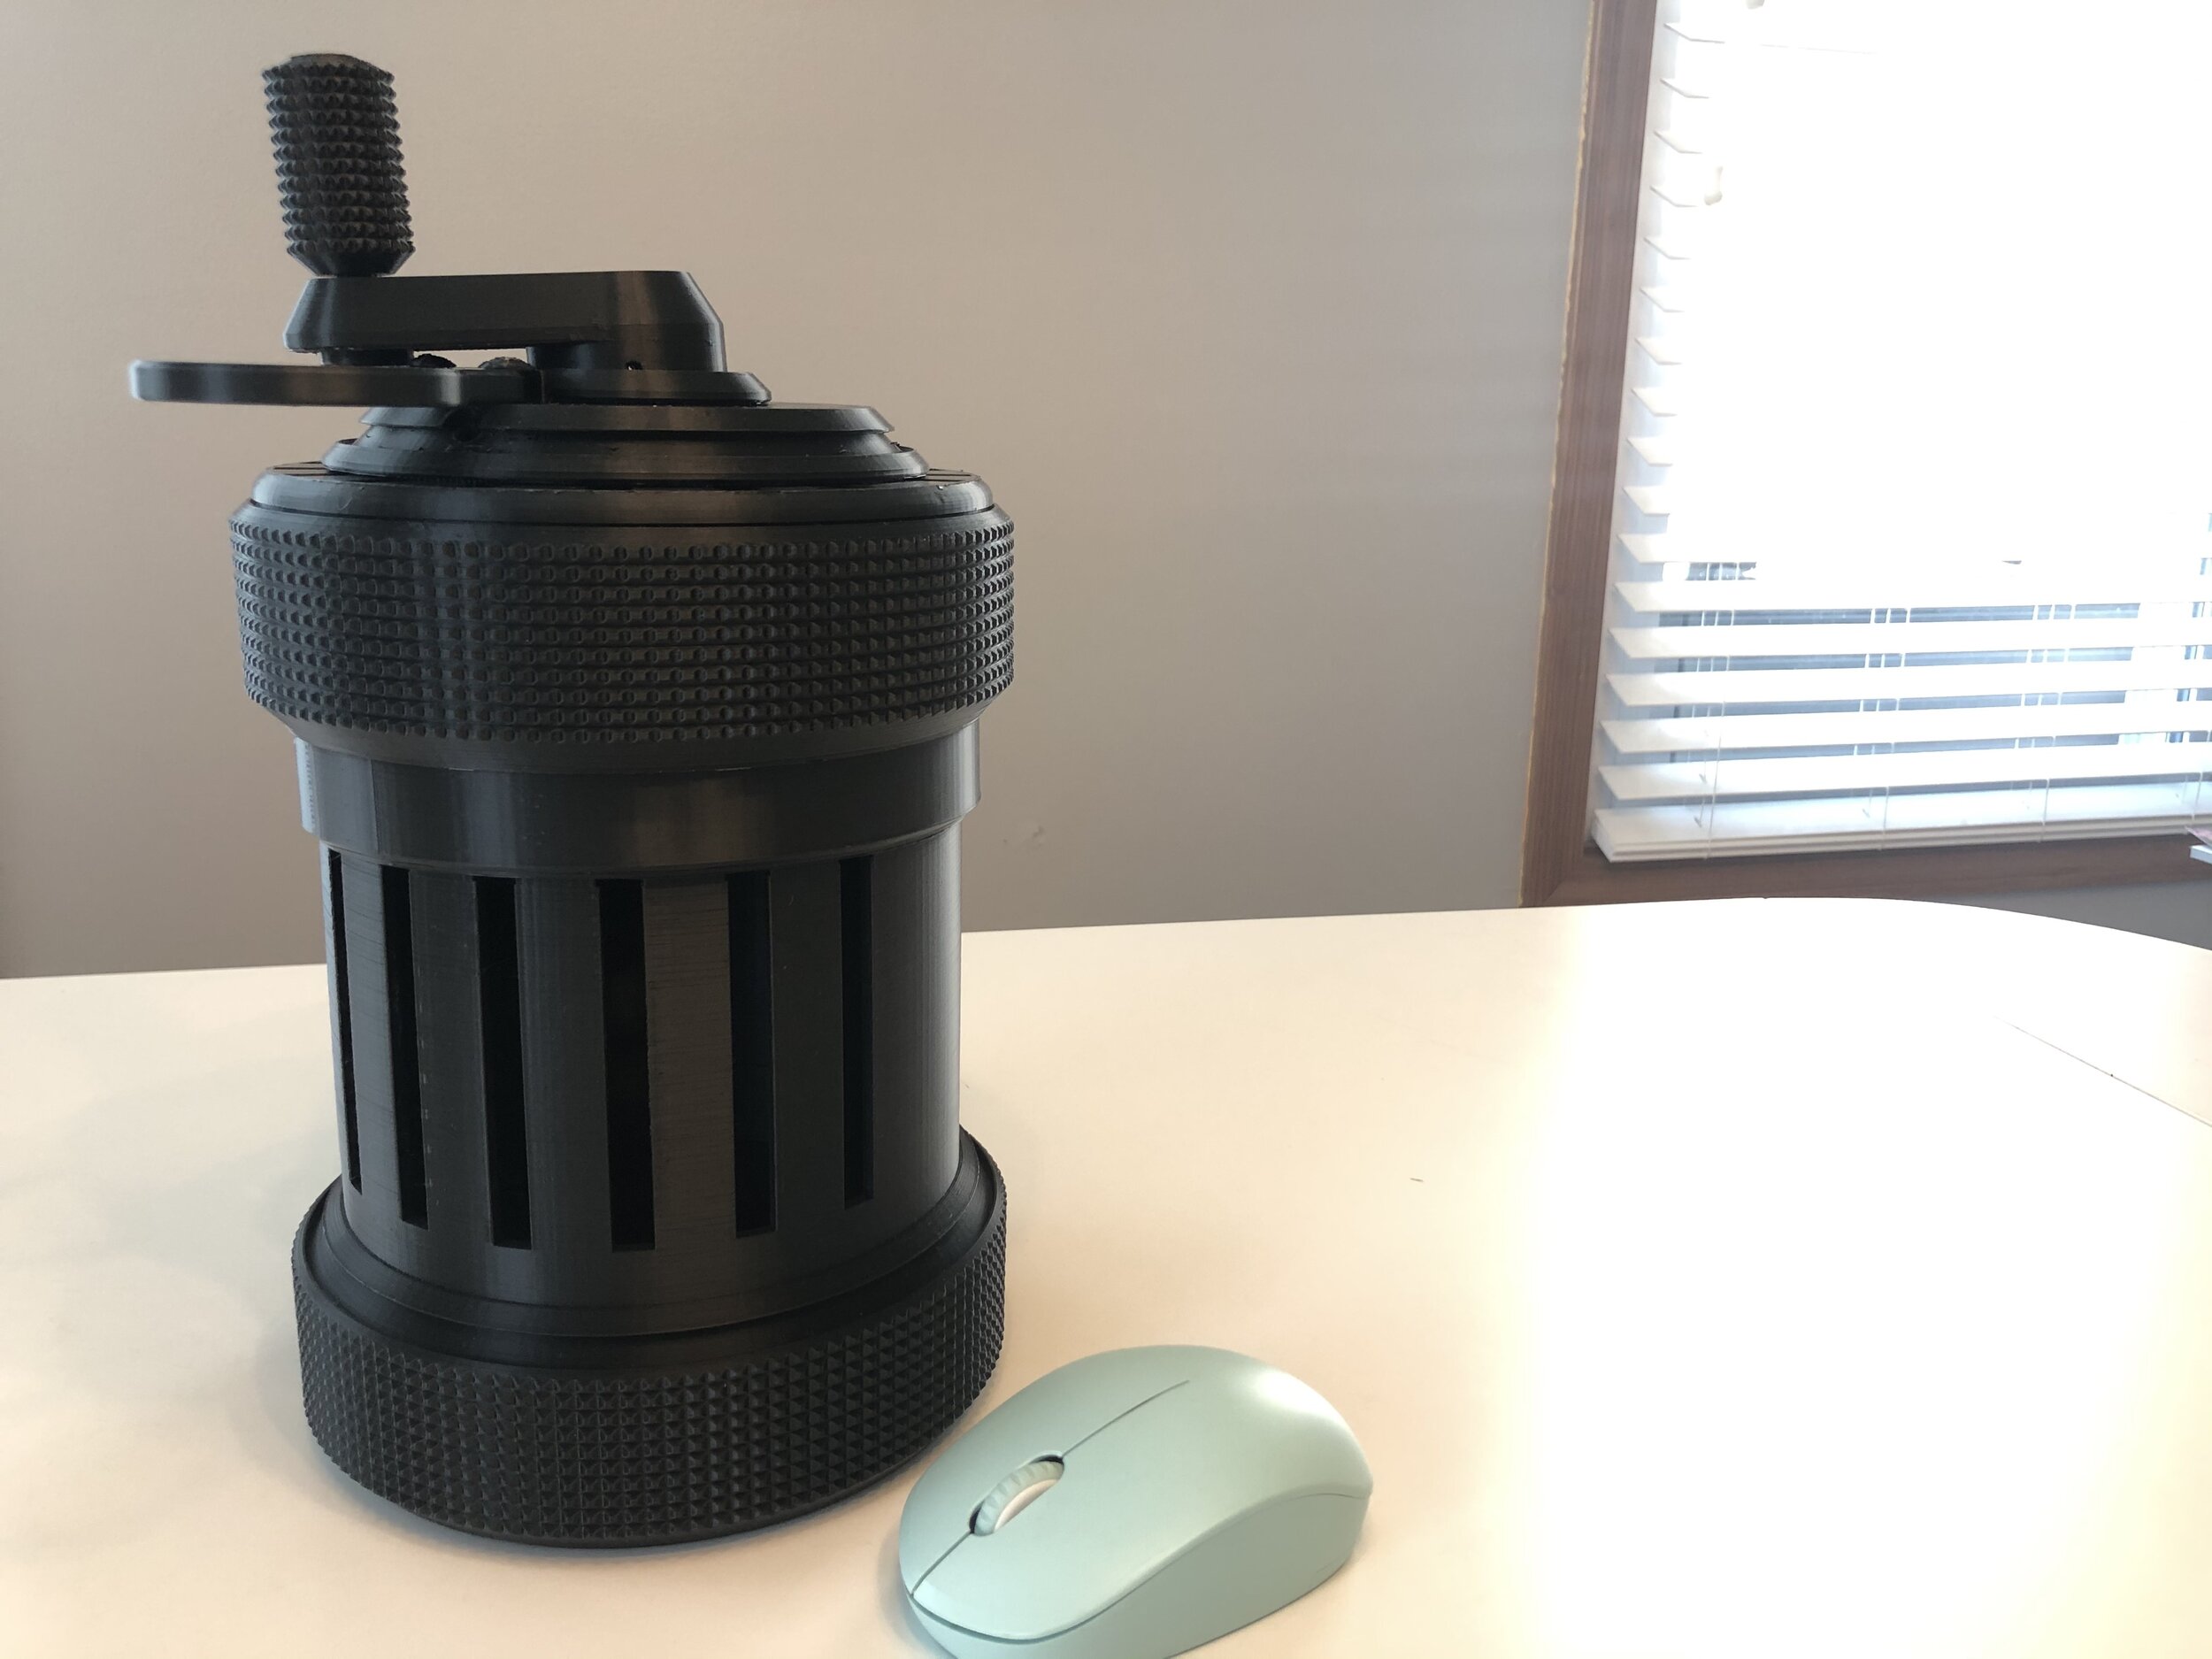
Status as of 6/19/2020
Most of the external 3D parts have been printed
Used the Hatchbox PLA, 1.75mm, Black
Next step is to print internal parts using silver color filament
Current Status
Started printing larger parts leveraging printer downtime during the nights.
Using eSun PLA, 1.75mm, Silver (silver is more like gray)
Once I have a set of key parts printed, I will test fit them and order necessary hardware parts.

PROJECT: RETROPIE - Retro Game Emulator - 2020 Reinstall

WORK IN PROGRESS -
NEW Retropie
Computer: Raspberry Pi 3B+ (supports 5GHz wifi)
Case: NESPi CASE+ (has the sub-board for safe shutdown) + Third-party oversized copper heat sink
OS: Retropie 4.5.1 (current as of April 2020)
SD card: 64GB
Joystick: Logitech Gamepad F310
OLD Retropie
Computer: Raspberry Pi 3B (limited to 2.5GHx wifi)
Case: NESPi CASE (does not have safe shutdown script support - need circuit level mod) + oversized aluminum heat sink
OS: Retropie (2017 version based on Jessi - no longer supported for update as of 2020)
SD card: 64GB
INSTALLATION TIPS
To move ROMs to the Retropie SD Card (on MacBook)
In Finder > GO > Connect to Server
smb://192.168.1.XXX. <— Retropie/RaspberryPi IP address (use IP scanner to find the IP). Connect as Guest
Navigate in to the ROM folder - these are directory of each emulators - you can just copy ROM files over here & the Retropie will find it in the emulator
Making Image backup of the SD Card
I use ApplePi-Baker in MacOS - when I create backup, I can choose compression (e.g. GZip) to save space of the backup image. When I restore, I can just restore this compressed file.
During the initial installation
After you install the Retropie image for the first time, there are a few things you should do
Game pad set up - press and hold the A button on the game pad
RetroPie Configurator
WiFi - Set Country
Raspi-Config -
Localization Option - Setup your country, keyboard etc to help you prevent issues with the keyboard etc
Keyboard Layout - my default was set to English (UK) preventing me from typing some keys like | - pick ‘Other’ and select ‘English (US)’ if you are using US based keyboard
RESOURCES
Youtube - Installation
ROM Secarch
TIPS
CURTA PROJECT VISION & GOALS
VISION
As a child, I had a certain fascination for electronic calculators. Only when I became a grownup, I learned about a Curta Mechanical Calculator. A small precision mechanical device that is a thing of beauty. What is more beautiful is the story of the inventor and the elegant design of the Curta. It is perhaps the first, only, and the last mechanical, portable, pocket calculator. Building one will provide a deeper insights and the engineering tradeoffs that the inventor had to make. Learning such insights and the wisdom of engineering is what I thrive on.
GOALS
2020 - Make a working Curta Type 1 model based on the 3D printed parts (along the way, also learn the art of digital fabrication and rapid prototyping by using a 3D printing technology)
Details about the PE6502 Kit

PE6502 is a Apple 1 style Build-Yourself kit computer. It was influenced by the original Apple 1 and some of the replicas built by the enthusiasts. As such, it should run all the programs made for the Apple 1 and the replicas. What I particularly like about the kit is that it has both Applesoft Lite and Integer BASIC built-in to the computer. Note that it is not a Apple 1 replica (meaning the circuits and the components are not the replica of the original Apple 1), but it replicates many of the functionality to include running of the Apple 1 softwares.
Retro computing purest may say it is not the same as the original. However, Apple 1 and/or the Apple II that are in good working condition are hard to come by nowadays. Also, they don’t necessarily serve as a good learning platform due to the “closed platform” versus “open source” that some of the modern kits provide. I really do think the “tinkering” and “hacking” is where the true learning and understanding comes from. As Mr. Jason Putnam mentions in his website, the kit will facilitate learning about the simple computer architecture, GLUE logic memory addressing, and a easy way to program assembly code for 6502.
As of 2019, the versions of the kits are available.
$130 USD - purple version of the kit includes the circuit board that is made in US
$110 USD - blue version includes the board that is made outside US
for more info - http://putnamelectronics.com/products.html
http://www.applefritter.com/?q=content/new-computer-kit-software-compatible-apple-1
Following are what is included in the kit
4" x 6" professionally made 2-layer circuit board (2 versions are available)
High quality components including WDC 65C02, and WDC 65C21 chips (socketed)
32k RAM memory
16K ROM - includes “Applesoft Lite”, Integer VASIC, Krusader assembler, Kursader mini-debugger
Fast serial port with onboard hardware handshaking - for fast code transfer to and from the PE6502
Onboard terminal software - a working delete key, Ctrl-Alt-Del terminal reboot, text color codes
Full expansion slot - some of the expansion cards are in development; MOS6581/SID interface card; CFFAI mass storage card)
kit also includes ribbon cable/DB9 connector that connects to the onboard header on the PE6502
PS/2 keyboard input, RCA composite output jacks
Assembly manual in English
Following are items you will ave to supply
TV with “composite” connection or a monitor with composite connector. Alternatively, a RCA-to-SVGA converter can be used with SVGA monitor. (Note that there are several other options made available by the enthusiasts that allows connection with the HDMI - I will update this page after I try a few on the market)
PS/2 keyboard (USB to PS/2 converters won’t work) - I will try some of the options available from the Vintage Computer Festival 2019 and update this page)
7-9v DC, tip-positive, 350-1000ma power adapter
The kit building requires some soldiering skills (no surface mount parts). It is not a difficult kit to build, but has some quirky things that the build have to be prepared for (e.g. after building the kit, make sure to clean the flux on the board etc.)
I will be adding some close up photos of the parts soon. Highly recommend it.
PE6502 Kit PROJECT VISION & GOALS
VISION
WIP
GOALS
Retro Kit building - Apple I style computer